
Bubbles, those mesmerizing orbs of iridescent wonder, have captivated the imagination since time immemorial. Their delicate beauty and fleeting existence make them a challenging yet enchanting subject for any artist. If you’ve ever wondered how to capture the ethereal essence of a bubble on paper, you’re in the right place. In this guide, we’re about to unveil the secrets to creating bubble art that practically shimmers off the page. Get ready to dive into a world of shimmering hues and learn how to draw a bubble like a true virtuoso. Let’s embark on this artistic journey together!
How Do You Draw A Bubble Painting?
To paint a simple bubble, start by drawing a circle with white paint onto the canvas. Then, add layers of translucent white and color mixture onto the circle to create the bubble effect. Finally, add highlights with white paint and details if desired. Bubble painting is a delightful and unique art form that combines the whimsy of bubbles with the creativity of painting. This unconventional technique allows artists to create stunning, abstract masterpieces with vibrant colors and intriguing patterns. Whether you’re an experienced artist looking to try something new or a beginner eager to explore the world of art, bubble painting is an excellent choice for unleashing your inner creativity. For more inspiration and resources, check out https://bubbleslidess.com.
In this comprehensive guide, we will take you through the step-by-step process of creating a mesmerizing bubble painting. Additionally, we’ll explore how to optimize your bubble painting content for SEO, ensuring that your artwork gains the recognition it deserves on the web.
The Materials You’ll Need:
Before we dive into the creative process, let’s gather the essential materials required for bubble painting:
Paints: Acrylic paints are an excellent choice for bubble painting due to their vibrant colors and quick drying time.
Bubble Solution: You can purchase bubble solution from a store or make your own by mixing dish soap with water.
Straws: Plastic straws work well for blowing bubbles.
Paper or Canvas: Choose a sturdy paper or canvas to create your masterpiece.
Palette and Brushes: Use a palette for mixing colors and a variety of brushes for different effects.
Now that we have our materials ready, let’s get started!
Step 1: Prepare Your Workspace
Set up your workspace in a well-ventilated area to ensure the paint fumes and bubble solution don’t become overwhelming. Lay down a drop cloth to protect your surfaces from potential spills.
Step 2: Mix Your Paints
Squeeze your desired paint colors onto the palette. Experiment with various color combinations to achieve the desired aesthetic for your bubble painting. Remember that bubble painting often produces abstract and unpredictable results, which is part of its charm.
Step 3: Create Your Bubble Solution
In a shallow container, mix the bubble solution. Ensure that it’s not too diluted; otherwise, the bubbles may not hold their shape. You want a solution that produces robust bubbles.
Step 4: Blow the Bubbles
Dip the end of a straw into the bubble solution, then blow gently to create a mound of bubbles on your canvas or paper. This is where the magic happens! As the bubbles pop against the surface, they will leave behind intricate patterns and splatters of paint.
Step 5: Add Your Colors
While the bubbles are still wet, gently press your canvas or paper onto the mound of bubbles. The bubbles will burst, transferring their vibrant colors onto the surface. Experiment with different angles and positions to create unique patterns.
Step 6: Let It Dry
Allow your bubble painting to dry completely. This may take some time, so be patient. As it dries, the colors will blend and form captivating abstract designs.
Optimizing Your Bubble Painting Content for SEO:
Now that you’ve created your beautiful bubble painting, it’s time to share it with the world. To ensure your artwork reaches a wider audience, here are some SEO tips:
Keyword Research: Identify relevant keywords related to bubble painting, such as “bubble painting techniques” or “abstract bubble art.” Incorporate these keywords naturally into your content.
High-Quality Images: Take clear, high-resolution photos of your bubble painting. Optimize these images with descriptive alt text and file names that include your target keywords.
Engaging Content: Write a compelling and informative blog post about your bubble painting experience. Share your creative process, tips, and insights. Engaging content encourages longer time spent on your page, which can boost SEO rankings.
Internal and External Links: Include internal links to related content on your website and external links to reputable sources. This improves your website’s authority and SEO performance.
Social Media Sharing: Share your bubble painting on social media platforms with relevant hashtags and a link back to your blog post. Social signals can positively impact SEO.
What Are Bubble Sketches?
Bubble diagrams are systems of lines and circles used in architecture to show relationships between functional areas of a program to develop an architectural plan. Bubble sketches, a delightful fusion of imagination and artistic prowess, have emerged as a unique form of visual expression. Combining the ephemeral allure of bubbles with the artistry of sketching, this genre offers a captivating canvas for both seasoned artists and budding creatives.
The Essence of Bubble Sketches
At its core, a bubble sketch is a visual representation of bubbles in various states – floating, bursting, or merging. The goal is to capture the intricate play of light and color, preserving the transient beauty of these iridescent spheres on paper. Through deft strokes and a keen eye for detail, artists bring forth a striking semblance of reality, while infusing their personal touch.
Materials for Bubble Sketching
To embark on your bubble sketching journey, you’ll need a few essential tools:
Quality Sketching Paper: Opt for a paper that can withstand fine lines and shading techniques without smudging.
Graphite Pencils: A range of pencils (H for light shading, B for darker tones) ensures versatility in your sketches.
Blending Tools: Tortillons or blending stumps help in achieving smooth transitions and soft gradients.
Eraser: A kneaded eraser is invaluable for precise corrections and highlights.
Reference Images: While skilled artists may rely on memory, having reference images of bubbles is immensely helpful for beginners.
Techniques for Bubble Sketching
Observation: Before putting pencil to paper, spend time observing real bubbles or high-quality images. Note the interplay of light, reflections, and shadows.
Basic Shapes: Start by sketching the basic outline of the bubble using light, circular strokes. Keep it loose and free-flowing.
Light and Shadow: Identify the primary light source in your reference image. Shade one side of the bubble darker to create a sense of volume.
Details and Highlights: Use a kneaded eraser to gently lift areas where light would naturally hit the bubble, creating highlights.
Reflections: Pay attention to the reflections within the bubble. These are crucial in conveying the transparent, three-dimensional quality.
Challenges and Tips
Bubble sketching, though enchanting, comes with its fair share of challenges. Achieving the delicate balance between translucence and opacity, as well as portraying the fragility of bubbles, requires practice and patience. Here are some tips to navigate these challenges:
Practice Patience: Start with smaller bubbles and work your way up to more complex compositions. Rome wasn’t built in a day, and neither are masterful bubble sketches.
Experiment with Lighting: Play with different lighting conditions to understand how they affect the appearance of bubbles. This experimentation will enrich your understanding of their visual dynamics.
Embrace Mistakes: Don’t be disheartened by imperfections. Every stroke is a step towards mastery, and even minor flaws add character to your sketches.
What Is Bubble Paint?
Using too thin or diluted a mixture can result in bubble paints. The added liquid weakens the binding agents in the paint, causing air bubbles to form and become trapped under the paint’s surface as it dries. Using too thin or diluted paint can also result in poor coverage and an uneven finish. Bubble paint is a unique and innovative art technique that combines the playful charm of bubbles with the creativity of painting. This captivating form of artistic expression has gained popularity for its ability to produce mesmerizing and unpredictable patterns. In this guide, we’ll delve into the world of bubble paint, exploring what it is and providing insights into how you can incorporate it into your artistic repertoire.
Defining Bubble Paint:
Bubble paint is a form of abstract art that involves using bubbles as a medium to create intricate patterns on a surface. Artists achieve this by mixing paint with a bubble solution, blowing bubbles onto a canvas or paper, and allowing them to burst against the surface. As the bubbles burst, they leave behind vivid, unpredictable patterns that form the basis of the artwork.
Materials Needed for Bubble Painting:
Before embarking on your bubble painting journey, it’s essential to gather the necessary materials:
Paints: Acrylic paints work best for bubble painting due to their vibrant colors and quick drying time.
Bubble Solution: You can purchase a pre-made bubble solution or create your own by mixing dish soap with water.
Straws or Bubble Wands: These are used to blow the bubbles onto the surface.
Surface for Painting: Opt for a sturdy canvas or heavy paper that can withstand the moisture from the bubble solution.
Drop Cloth or Protective Covering: To safeguard your workspace from potential spills.
Creating Bubble Paint Art: Step by Step
Preparation: Set up your workspace in a well-ventilated area. Lay down a drop cloth to protect surfaces. Ensure you have all your materials within easy reach.
Mixing Paints: Squeeze a selection of acrylic paints onto a palette. Experiment with different color combinations to achieve the desired effect for your bubble painting.
Preparing the Bubble Solution: In a shallow container, mix the bubble solution. Aim for a solution that produces robust bubbles without being overly diluted.
Blowing Bubbles: Dip the end of a straw or bubble wand into the bubble solution, and blow gently to create a mound of bubbles on your chosen surface.
Transferring Bubbles: While the bubbles are still wet, carefully press your canvas or paper onto the mound of bubbles. As the bubbles burst against the surface, they will leave behind a stunning array of colors and patterns.
Drying Time: Allow your bubble painting to dry completely. As it dries, the colors will blend and merge, creating a visually captivating abstract piece.
Optimizing Bubble Paint Content for SEO:
To ensure that your bubble paint creations gain the recognition they deserve on the web, it’s crucial to optimize your content for search engines. Here are some SEO strategies tailored for bubble painting:
Keyword Integration: Conduct thorough keyword research to identify relevant terms such as “bubble paint techniques” or “abstract bubble art.” Incorporate these keywords naturally into your content.
High-Quality Imagery: Capture clear, high-resolution images of your bubble paintings. Optimize these images with descriptive alt text and file names containing your target keywords.
Engaging Descriptions: Write compelling descriptions for your bubble paintings, providing insights into your creative process, color choices, and inspirations. Engaging content can improve user experience and SEO rankings.
Internal and External Links: Include relevant internal links to other content on your website and external links to authoritative sources. This helps establish your website’s credibility and enhances SEO performance.
Social Media Promotion: Share your bubble paintings on social media platforms, using relevant hashtags and a link back to your blog or website. Social signals can have a positive impact on your SEO efforts.
What Is A Cartoon Bubble Called?
A speech bubble is a shape, like a cloud, balloon or bubble, which contains text representing a character’s speech. It can also be called a speech balloon, a word balloon or a dialogue balloon.
Cartoons, with their ability to distill complex emotions and messages into simple, easily digestible images, have become a cornerstone of modern visual communication. Central to this art form are the speech and thought bubbles that convey the words and inner thoughts of characters. But what exactly are these distinctive elements called? In this exploration, we’ll uncover the terminology behind these vital components of cartoon storytelling.
The Vernacular: Speech and Thought Bubbles
In the world of cartoons and comics, the containers that encase dialogue and thoughts are known as speech bubbles and thought bubbles, respectively. These visual devices serve as windows into the minds and expressions of characters, providing context and nuance to the narrative.
Speech Bubbles: Giving Voice to Characters
Speech bubbles are the most common form of communication in cartoons. They are typically oval or elliptical shapes containing text that represents spoken words. The tail of the bubble, often referred to as the “stem,” extends from the speaker to indicate the source of the speech. This visual cue helps readers attribute the words to the corresponding character.
Thought Bubbles: Delving into Inner Worlds
In contrast, thought bubbles are used to convey a character’s internal musings, feelings, or inner dialogue. These bubbles often take on a cloud-like or rounded shape to visually differentiate them from speech bubbles. They lack a tail, as thoughts are inherently personal and do not have a discernible source.
Additional Variations: Scream, Whisper, and More
Beyond speech and thought bubbles, cartoons employ a range of specialized bubbles to convey specific tones and emotions:
Scream Bubbles: These bubbles have jagged or irregular edges, indicating that the character is shouting or yelling.
Whisper Bubbles: Designed with a softer contour, these convey hushed or secretive conversations.
Exclamation Bubbles: These are used to emphasize a character’s surprise, excitement, or strong emotions.
Narrative Boxes: These rectangular or square panels contain text that provides context or commentary on the unfolding scene.
SEO Optimization: Why Understanding Cartoon Bubble Terminology Matters
Understanding the terminology of cartoon bubbles is not only crucial for artists and enthusiasts but also for writers and marketers looking to optimize content for online platforms. Incorporating these terms into relevant content can enhance search engine visibility, especially in queries related to comic creation, illustration, and visual storytelling.
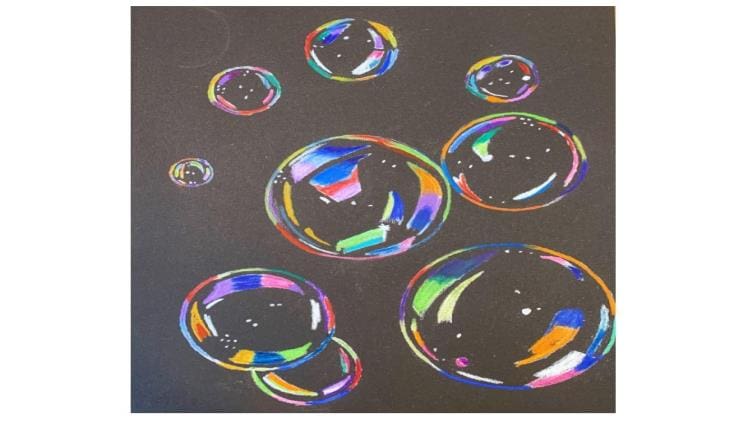
How Do You Draw A Realistic, Three-Dimensional Bubble?
Drawing a realistic, three-dimensional bubble is an art form that requires a keen eye for detail and a delicate touch. Capturing the ethereal beauty and translucency of a bubble on paper is a challenge that can lead to stunning results. In this guide, we’ll walk you through the steps to create a bubble that seems to leap off the page, and we’ll also provide insights on optimizing your content for SEO.
The Anatomy of a Bubble:
Before we delve into the process, it’s crucial to understand the key elements that make a bubble appear three-dimensional:
Perfect Circle: Start by sketching a flawless circle to form the outer edge of the bubble. This establishes the basic structure.
Inner Reflection: Inside the circle, add a smaller, curved oval. This represents the reflective surface within the bubble.
Translucency: Bubbles are inherently translucent. To convey this quality, choose colors and shading techniques that allow some light to pass through.
Step-by-Step Guide:
Sketch the Perfect Circle:
Begin by drawing a meticulously round circle. Use light strokes to ensure precision. This will serve as the foundation of your three-dimensional bubble.
Add the Inner Reflection:
Inside the circle, draw a smaller, curved oval. This represents the reflective surface within the bubble. Pay attention to the placement and curvature to achieve a convincing effect.
Shade for Depth:
To create a 3D effect, add shading around the edges of the circle. Darken the areas where the bubble overlaps itself or where it touches a surface. This gives the bubble depth and dimension.
Blend Colors for Translucency:
Bubbles exhibit a translucent quality, allowing light to pass through. Use soft, iridescent colors like blues, purples, and pinks. Blend them gently to mimic this effect. Avoid harsh lines for a more natural appearance.
Highlights for Reflectivity:
Identify the light source in your drawing. Add highlights on the side facing the light to create the illusion of a reflective surface. These highlights should be subtle but effective in conveying the bubble’s shine.
Refine and Detail:
Pay close attention to details. Add small imperfections and irregularities to mimic the natural variations found in bubbles. These subtle touches contribute to the realism of your drawing.
Optimizing Your Content for SEO:
Now that you’ve mastered the art of drawing a three-dimensional bubble, it’s time to ensure your content reaches a wider audience. Here are some SEO strategies tailored for this topic:
Keyword Integration:
Identify relevant keywords like “realistic bubble drawing” or “3D bubble art” and incorporate them naturally into your content, including headings and meta descriptions.
High-Quality Images:
Include clear, high-resolution images of your bubble drawing. Optimize these images with descriptive alt text and file names containing your target keywords.
Engaging Descriptions:
Write compelling descriptions of your drawing process. Share insights on your techniques, color choices, and inspirations. Engaging content can improve user experience and SEO rankings.
Internal and External Links:
Include relevant internal links to other related content on your website and external links to reputable sources. This helps establish your website’s authority and enhances SEO performance.
Social Media Promotion:
Share your bubble drawing on social media platforms with relevant hashtags and a link back to your blog or website. Social signals can positively impact your SEO efforts.
What Techniques Can Be Used To Create A Shimmering Effect In A Bubble Drawing?
Bubbles, with their ephemeral beauty and captivating iridescence, have long been a subject of fascination for artists. Capturing that enchanting shimmer on paper requires a blend of technique, observation, and a touch of artistic finesse. In this guide, we’ll delve into the techniques that can elevate your bubble drawings, infusing them with a mesmerizing, shimmering quality.
1. Layering with Colored Pencils
One of the most effective ways to achieve a shimmering effect in bubble drawings is through layering with colored pencils. Start with a light base color and gradually build up layers of translucent hues. Focus on the areas where light hits the bubble, leaving some parts lighter for highlights. This layering technique mimics the way light interacts with the surface of a bubble, creating a realistic and shimmering appearance.
2. Utilizing a White Gel Pen for Highlights
White gel pens are invaluable tools for adding highlights and enhancing the illusion of transparency in bubble drawings. Use the gel pen to carefully trace along the edges where light hits the bubble’s surface. This creates a striking contrast that mimics the reflective quality of real bubbles, giving them a luminous, shimmering appearance.
3. Blending with Solvents
For artists working with colored pencils, blending with solvents can take your bubble drawings to the next level. Gamsol or other blending solutions can be applied using a brush or blending stump to smooth out colors and create a seamless transition between shades. This technique helps achieve a more realistic, glass-like texture that enhances the shimmering effect.
4. Incorporating Metallic or Iridescent Mediums
To truly capture the iridescence of bubbles, consider using metallic or iridescent mediums. These specialized art supplies contain reflective particles that add a subtle shimmer to your drawings. Apply these mediums selectively to areas where you want to accentuate the sparkle and shine of the bubble’s surface.
5. Experimenting with Different Paper Textures
The texture of the paper you use can greatly influence the final outcome of your bubble drawing. Opt for papers with a smooth surface to allow for precise detailing and smoother blending. However, consider experimenting with textured papers to add an extra dimension of realism. The texture can interact with your drawing materials to create a tactile, shimmering effect.
How Can You Make A Bubble Drawing Look More Realistic With Shadows And Highlights?
Adding shadows and highlights to a bubble drawing is a transformative technique that breathes life into your artwork. It allows you to capture the delicate interplay of light and reflection, making your bubble appear more lifelike and three-dimensional. In this guide, we’ll explore how to master the art of incorporating shadows and highlights into your bubble drawings for a realistic effect, along with SEO strategies to ensure your content reaches a broader audience.
Understanding the Play of Light:
Before we dive into the process, it’s essential to grasp the fundamental principles of how light interacts with a bubble’s surface:
Light Source Identification: Determine the direction of the light source in your drawing. This will dictate where shadows and highlights will fall on the bubble’s surface.
Shadow Placement: Shadows form on the side of the bubble that is opposite to the light source. They add depth and dimension, creating the illusion of a rounded shape.
Highlight Application: Highlights occur on the side of the bubble facing the light source. They represent areas where light is directly reflected, emphasizing the bubble’s shininess.
Step-by-Step Guide:
Identify the Light Source: Begin by determining where the light is coming from in your drawing. This will be the guiding factor for placing shadows and highlights.
Shade the Opposite Side for Shadows: On the side of the bubble opposite to the light source, apply a gentle layer of shading. Use a lighter pencil or brush to start, gradually building up the intensity to create a realistic shadow effect.
Blend for Smooth Transitions: Blend the shaded area seamlessly with the rest of the bubble’s surface. This ensures a natural transition between the shadowed and unshadowed regions.
Apply Highlights on the Light-Facing Side: On the side facing the light source, carefully add highlights using a lighter color or a white pencil. Focus on the areas where light would directly reflect off the bubble’s surface.
Gradually Build Highlight Intensity: Begin with a light touch and gradually intensify the highlights. This gradual approach mimics the way light interacts with the bubble, creating a more realistic effect.
Refine and Add Detail: Pay close attention to the details. Incorporate subtle imperfections or irregularities to mimic the natural variations found in bubbles. These nuances contribute to the overall realism of your drawing.
Optimizing Your Content for SEO:
Now that you’ve mastered the technique of adding shadows and highlights to your bubble drawing, it’s time to ensure your content gains the visibility it deserves. Here are SEO strategies tailored for this topic:
Keyword Integration:
Identify relevant keywords such as “realistic bubble drawing techniques” or “shading and highlighting in bubble art.” Integrate these naturally into your content, including headings and meta descriptions.
High-Quality Images:
Include clear, high-resolution images of your bubble drawing, showcasing the use of shadows and highlights. Optimize these images with descriptive alt text and file names containing your target keywords.
Engaging Descriptions:
Craft compelling descriptions of your drawing process. Share insights on your techniques, color choices, and inspirations. Engaging content enhances user experience and can boost SEO rankings.
Internal and External Links:
Incorporate relevant internal links to other related content on your website and external links to reputable sources. This helps establish your website’s authority and enhances SEO performance.
Social Media Promotion:
Share your bubble drawing on social media platforms, using relevant hashtags and a link back to your blog or website. Social signals can have a positive impact on your SEO efforts.
What Are Some Tips For Capturing The Delicate, Translucent Quality Of Bubbles In A Drawing?
Bubbles, those enchanting ephemeral spheres, have a unique quality that makes them a captivating subject for artists. Their delicate translucency presents a challenge, but with the right techniques, you can bring their ethereal beauty to life on paper. In this guide, we’ll explore some invaluable tips to help you master the art of rendering bubbles with a level of realism that truly captures their delicate, translucent essence.
1. Start with a Light, Preliminary Sketch
Begin by lightly sketching the basic shape of the bubble. Keep your lines loose and free-flowing. Avoid applying too much pressure on the pencil to maintain a sense of delicacy in your initial sketch. This light framework will serve as the foundation for building up layers of color and detail.
2. Use Translucent Colors and Layers
When it comes to adding color, opt for translucent shades. Watercolors or colored pencils work particularly well for this purpose. Begin with a light wash of color and gradually build up layers, allowing each one to dry or set before applying the next. This gradual layering technique mimics the way light passes through a bubble, creating a more realistic and translucent appearance.
3. Pay Attention to Light and Shadows
Understanding the interplay of light and shadow is crucial for capturing the delicate translucency of bubbles. Identify the primary light source in your reference or imagination. Light will typically hit one side of the bubble more directly, while the opposite side will be in shadow. Use gentle shading to create the illusion of volume and depth.
4. Preserve White Areas for Highlights
Preserve areas of the paper to serve as highlights. These untouched areas will represent the brightest spots on the bubble’s surface where light reflects most intensely. Using an eraser, carefully lift any excess color to enhance these highlights, adding to the illusion of translucency.
5. Experiment with Blending Techniques
Blending techniques can be incredibly effective in achieving a translucent quality. Use blending stumps, tortillons, or even your fingertip to gently blend colors together. This softens edges and creates a smoother transition between shades, contributing to the overall delicate appearance of the bubble.
6. Incorporate Reflective Details
Bubbles often exhibit small, reflective details on their surfaces. These can be tiny reflections of their surroundings or even reflections of other bubbles nearby. Adding these subtle details with a fine-tipped pen or a sharp pencil helps to convey the intricate, translucent nature of the bubble.
7. Be Patient and Practice
Capturing the delicate, translucent quality of bubbles is a skill that requires patience and practice. Start with simpler compositions and gradually work your way up to more complex scenes. Each attempt, whether successful or not, is a valuable learning experience that brings you closer to mastering this unique art form.
Conclusion
Mastering the art of drawing a bubble unlocks a world of creativity and imagination. By following the steps outlined in this guide, you’re equipped with the techniques to capture the ethereal beauty of bubbles on paper. Remember, practice and experimentation are key to perfecting your bubble-drawing skills. So grab your tools, let your creativity soar, and watch as your drawings come to life with a touch of bubbly magic! Happy drawing!
Frequently Asked Questions (FAQs)
- Is it necessary to use a reference image when drawing a bubble?
While skilled artists may draw from memory, having a reference image of a bubble can be immensely helpful, especially for beginners or when aiming for a high level of realism.
- What are some common mistakes to avoid when drawing bubbles?
One common mistake is overworking the drawing, which can result in a loss of the bubble’s delicate appearance. Additionally, neglecting to pay attention to light and shadow dynamics can lead to a flat, unrealistic depiction.
- How can I practice drawing bubbles effectively?
Start with simpler compositions and gradually progress to more complex scenes. Be patient with yourself and embrace each attempt, as each one is a valuable learning experience.
- Can I use digital tools for drawing bubbles, or is it best done traditionally?
Drawing bubbles can be done both traditionally and digitally. The key is to understand the principles of light, shadow, and translucency, which apply to both mediums.
5.. Are there any specific tips for drawing bubbles in a specific environment, like underwater or against a colorful background?
When drawing bubbles in specific environments, consider how the surroundings affect the appearance of the bubble. For instance, underwater bubbles may have a slightly distorted shape, while those against a colorful background may reflect those hues.
- How do I make my bubble drawings more unique and expressive?
Experiment with different compositions, lighting scenarios, and colors. Infuse your personal style and creativity into each drawing to add a unique touch that sets your bubble art apart.
- How do I add reflections and details to make my bubble drawing more realistic?
Incorporate small, reflective details on the bubble’s surface using a fine-tipped pen or pencil. These can be reflections of the surroundings or other nearby bubbles, adding realism to your drawing.